This post is also available in: Bahasa Malaysia Bahasa Indonesia
When migrating to ABSS for the first time, entering accurate opening balances is essential for reliable financial reporting. These balances include:
- Account balances
- Job balances (if applicable)
- Customer balances
- Supplier balances
- Inventory balances (if applicable)
This guide walks you through each step to ensure your setup is complete and accurate.
Important: These steps should only be done once, when you first start using ABSS. After you have set and verified these balances, DO NOT make any changes.
Step 1: Prepare Your Opening Balances
Before entering anything into ABSS, gather:
- Your Trial Balance from the previous financial year
- A list of outstanding customer invoices
- A list of outstanding supplier bills
- Inventory quantities and values (if you track inventory)
Step 2: Enter Account Opening Balances
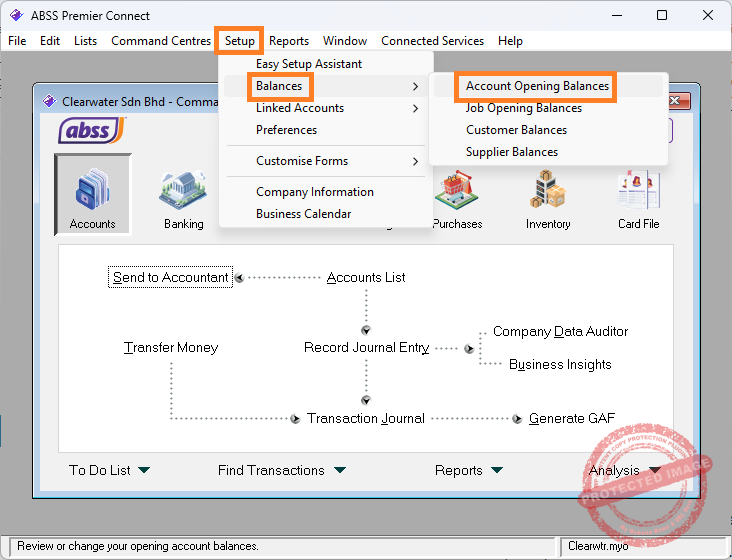
- Navigate to Setup, Balances, Account Opening Balances.
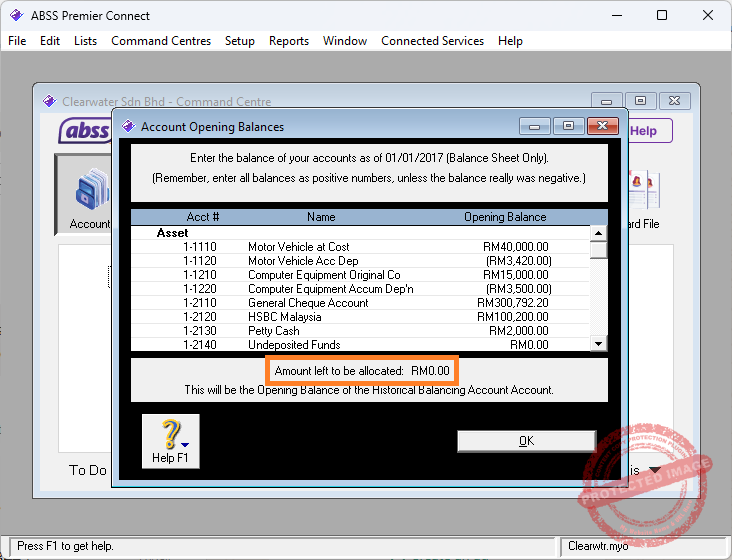
- Enter the balances for each account based on your trial balance.
- Ensure total debits equal total credits. If not, ABSS will show an Amount left to be allocated at the bottom.
- Click OK to save.
Tip: Consult your accountant if you’re unsure which accounts to update.
Step 3: Enter Customer Opening Balances
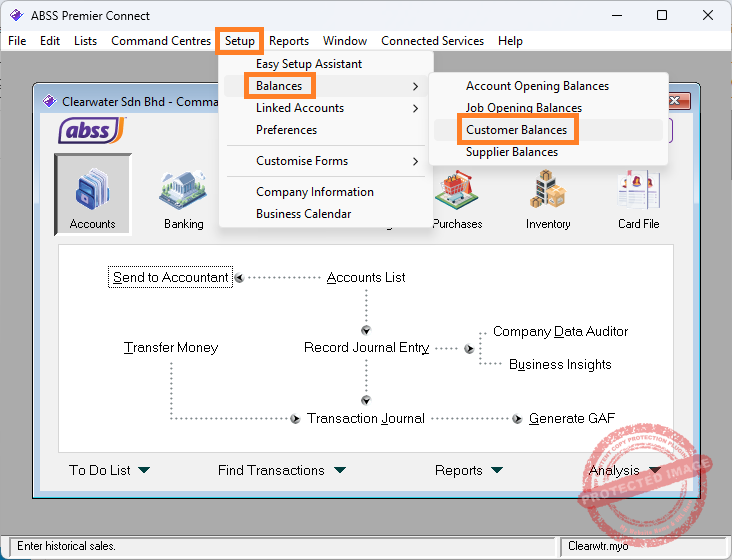
- Go to Setup > Balances > Customer Opening Balances.
- For each customer:
- Enter the invoice number, date, and amount due.
- Repeat for all customers with outstanding balances.
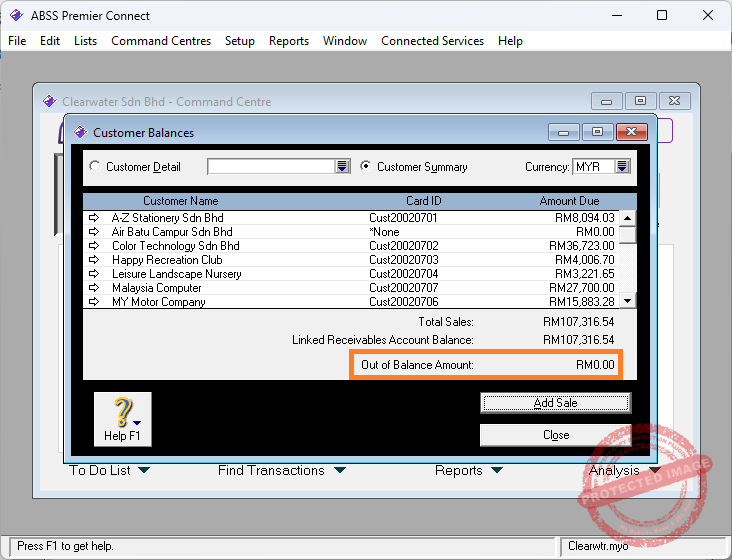
- Ensure the total customer balance matches the Accounts Receivable balance in your trial balance.
Out of Balance Warning: This appears if the total customer balances do not match the Accounts Receivable control account. It indicates a discrepancy that must be resolved.
Step 4: Enter Supplier Opening Balances
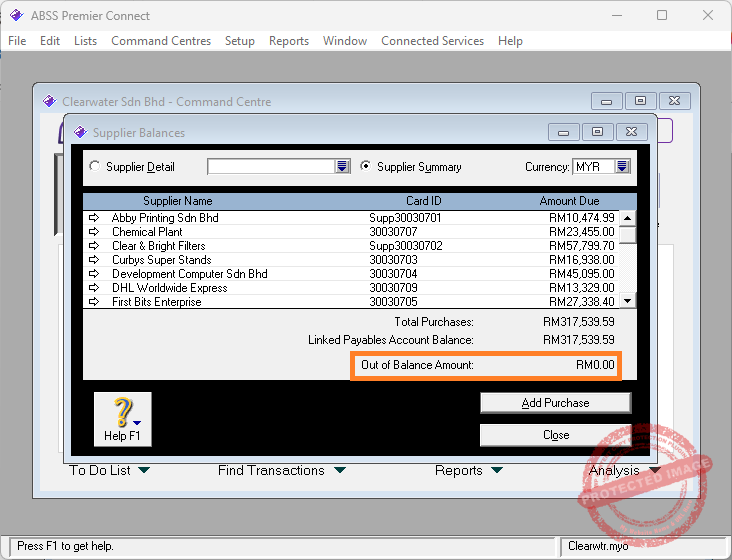
Out of Balance Warning: This indicates a mismatch between supplier balances and the Accounts Payable control account.
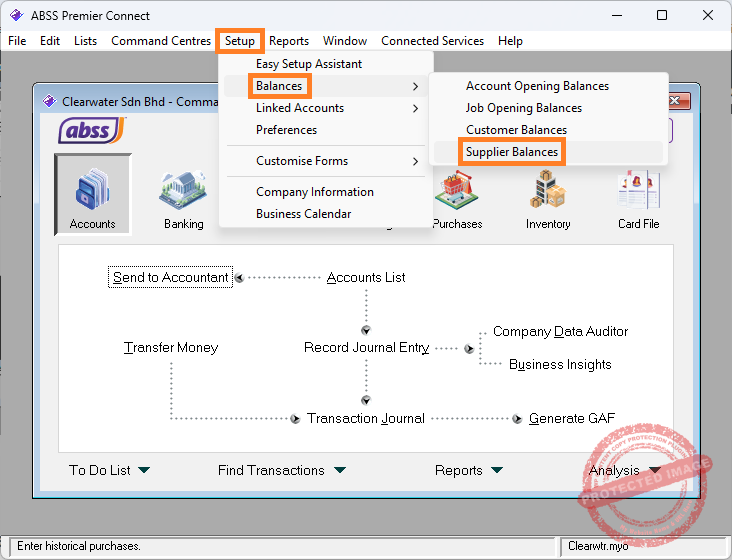
- Go to Setup > Balances > Supplier Opening Balances.
- For each supplier:
- Enter the bill number, date, and amount due.
- Repeat for all suppliers with outstanding bills.
- Ensure the total supplier balance matches the Accounts Payable balance in your trial balance.
Step 5: Enter Inventory Opening Balances (Correct Method)
Inventory balances are not entered via Setup > Balances. Instead, follow these steps:
Step 5.1: Enable Inventory Tracking
- Go to Setup > Preferences > Inventory.
- Tick I Buy and Sell Inventory.
- Confirm that the Inventory Asset account is correctly linked.
Step 5.2: Create Inventory Items
- Go to Inventory > Items List.
- Click New to create each item.
- Fill in:
- Item Number & Name
- Buying & Selling Details
- Linked Accounts (especially Inventory Asset)
Step 5.3: Enter Opening Quantities and Values
Use the Adjust Inventory feature:
- Go to Inventory > Adjust Inventory.
- Select the item.
- Enter:
- Quantity on Hand
- Unit Cost
- Adjustment Date (usually the first day of the financial year)
- Ensure the adjustment posts to the correct Inventory Asset account.
Step 5.4: Verify Inventory Value
Run the Inventory Value Reconciliation Report:
- Go to Reports > Inventory > Inventory Value Reconciliation
- Confirm that the total matches your Inventory Asset account in the trial balance.
What Does “Out of Balance” Mean?
In ABSS, Out of Balance refers to a mismatch between:
- Customer balances and the Accounts Receivable account
- Supplier balances and the Accounts Payable account
This usually happens when:
- You forget to enter a customer or supplier balance
- You enter incorrect amounts
- The control account balances were entered incorrectly
To fix it: Recheck your entries and ensure the totals match your trial balance.
Final Tips
- Always back up your data before making major changes.
- Use reports to verify accuracy.
- If unsure, consult your accountant or reach out to support.

